You decided to run your first Facebook ad. You opened Meta Ads Manager. Twenty tabs, a hundred toggles, three "objectives" you've never heard of, and a budget field staring at you. Five minutes later you closed the tab and went back to organic posting.
This guide fixes that. It is a complete walkthrough for facebook ads beginners launching their first campaign — written for people who have zero experience inside Ads Manager, no agency, and no budget to waste. By the end of the next 30 minutes you will have a live campaign collecting real data on real customers.
But before we click anything, one warning: 90% of beginner guides skip the single step that separates a profitable first campaign from a $50 lesson in regret. We'll cover that step in detail in section 9. It's the one that pros do automatically and beginners never even hear about.
Let's begin.
What You Need Before Your First Facebook Ad
Most beginners fail their first campaign before they ever click "Publish" because they skip preparation. Spend ten minutes on this checklist and you'll save yourself a week of confusion later.
You need:
- A Facebook personal profile in good standing (no recent restrictions).
- A Facebook Page for your business. Personal profiles cannot run ads. If you don't have one, we'll create it in Step 1.
- A landing page or product page that loads fast on mobile. If your link takes more than three seconds to open on a phone, fix that first. Mobile makes up over 95% of Facebook ad traffic.
- A payment method — credit card, debit card, or PayPal in supported regions.
- One clear offer. Not three. Not "everything in our store." One product, one promise, one call to action.
- At least one image or short video that represents your offer. 1080×1080 px square or 1080×1350 px portrait works best.
- Two or three pieces of ad copy — headline, primary text, description. Don't worry about being clever. Clarity beats cleverness on a cold audience.
- A daily budget you can lose. Treat your first campaign as paid education. Most beginners should start with $5–$15 per day.
If you're missing any of these, stop reading, fix them, and come back. The next 30 minutes assume you have everything above ready.
Step 1: Create Your Business Page and Ad Account
If you already have a Page and an Ad Account, jump to Step 2.
- Go to business.facebook.com and click Create Account. Enter your business name, your name, and a work email.
- Inside Meta Business Suite, open Settings (the gear icon).
- Under Accounts → Pages, click Add → Create a new Page. Name it after your brand, pick a category, and click Create.
- Under Accounts → Ad accounts, click Add → Create a new ad account. Pick your country, currency, and time zone carefully — you cannot change them later, and your reporting will be locked to whatever you select.
- Assign yourself as admin on both the Page and the Ad Account.
- Under Payments, add a credit card.
That's the boring part. You now have a real business presence on Meta and a place to run ads from. Total time: about 5 minutes.
Step 2: Install Meta Pixel (5 Minutes)
The Meta Pixel is a small snippet of code that lets Facebook see what people do on your website after they click your ad. Without a pixel, Facebook is shooting blind, and your campaigns will never optimize properly.
- In Business Suite, go to Events Manager (left sidebar).
- Click Connect Data Sources → Web → Connect.
- Name your pixel after your brand and enter your website URL.
- Choose Install code manually if you control your own site, or Use a Partner Integration for Shopify, WordPress, Wix, Squarespace, etc. Partner integrations install with two clicks.
- After installation, click Test Events and visit your site. You should see "PageView" fire within a few seconds. If it doesn't, the pixel isn't installed.
- Set up at least one custom conversion — usually "Purchase," "Lead," or "AddToCart" — depending on your business model.
Skipping the pixel is the single biggest mistake new advertisers make. Your campaign will run, but Facebook's algorithm will have no idea who bought, who didn't, and who to show your ad to next. Don't skip it.
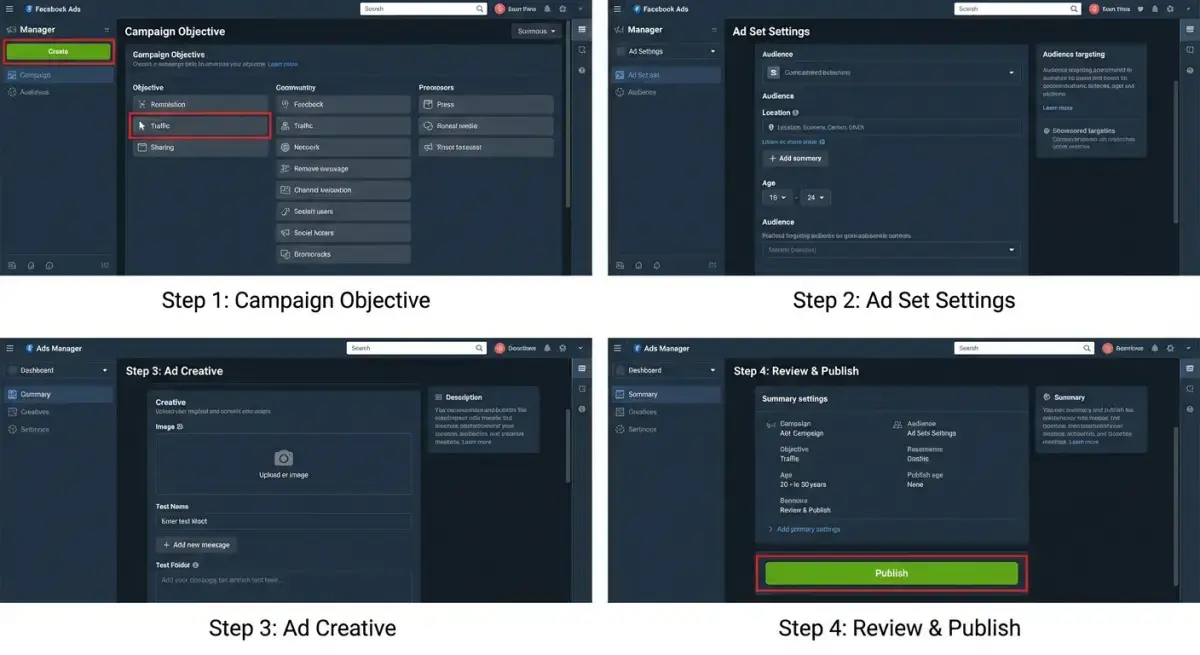
Step 3: Choose Your Campaign Objective
Now we're inside Ads Manager (adsmanager.facebook.com). Click the green Create button.
 Step 3: Choose Your Campaign Objective
You'll see six objectives. As a beginner, ignore four of them and focus on the two that actually matter for your first campaign:
- Sales — pick this if you sell a product directly online and want purchases. The pixel will optimize for buyers.
- Leads — pick this if you collect email addresses, demo requests, or service inquiries.
The other objectives (Awareness, Traffic, Engagement, App Promotion) are tempting because they look cheap. Resist. Cheap clicks from an "Engagement" or "Traffic" campaign are almost never the same people who buy. Optimize for the action you actually want.
Name your campaign with a format you'll remember in three months: YYYY-MM | Product | Audience | Objective. Future-you will thank present-you.
Leave Advantage Campaign Budget (CBO) OFF for your very first campaign. You want one ad set so you can clearly see what's happening.
Step 4: Set Up Your First Ad Set — Audience and Budget
This is where most beginners burn money. Read carefully.
Conversion event: select the pixel event you set up in Step 2 (Purchase, Lead, etc.).
Daily budget: start at $10–$15. Anything less and Facebook's algorithm runs out of data. Anything more and you're paying tuition for a class you haven't taken.
Schedule: start now, no end date.
Audience:
- Location: the country (or city) you actually sell to. Don't pick "Worldwide."
- Age: keep it broad — for example 25–55. Narrow later, based on data.
- Gender: All, unless your product is gender-specific.
- Detailed Targeting: add one clear interest that maps to your customer. For a yoga mat brand, "Yoga." For a SaaS bookkeeping tool, "Small business owners." Do not stack five interests — Meta's algorithm now performs better with broad audiences than with hyper-narrow ones.
- Languages: the language your ad and landing page are in.
Placements: select Advantage+ Placements. Let Meta decide where your ad runs. Manual placements are an optimization for advanced users.
Optimization & Delivery: leave defaults. Do not touch the bid cap.
That's it. The whole ad set should take five minutes. If you find yourself opening 12 expandable sections, you're overthinking it.
Step 5: Create Your Ad — Copy, Image, CTA
Click Next to enter the Ad level. This is the creative — the part the customer actually sees.
- Identity: select your Facebook Page (and Instagram account, if connected).
- Format: start with Single image or video. Carousels and collections are powerful, but they add complexity you don't need on day one.
- Media: upload your image or video. Square 1080×1080 px works almost everywhere. For Stories and Reels placements, Meta will auto-crop, but a vertical 1080×1920 px asset performs better.
- Primary Text: the chunk of copy above the image. Keep it under 125 characters so it doesn't get truncated. Lead with a benefit or a tension your customer feels: "Your dog won't stop pulling on walks? This harness fixes it in one wear."
- Headline: 27 characters or less. Make it concrete. "Stop the pulling — today."
- Description: optional, but useful for offers: "Free shipping. 30-day returns."
- Destination: your landing page URL. Add UTM parameters if you use Google Analytics — for example
?utm_source=facebook&utm_medium=cpc&utm_campaign=2026-04-launch. - Call to Action: pick the one that matches your goal — Shop Now, Sign Up, Learn More, Get Offer.
One ad. One message. One CTA. We're not split-testing yet — we're shipping.
Step 6: Review and Launch
Before you click Publish, run this five-second sanity check:
 Step 6: Review and Launch
- Does the ad preview look right on Mobile Feed, Stories, and Reels? Use the preview dropdown in the right panel.
- Is the destination URL clickable and does it open the right page on mobile?
- Is your daily budget what you intended (not 10× larger because you missed a comma)?
- Is the pixel "Active" in Events Manager?
If everything checks out, click Publish. Meta will review your ad. Most ads get approved within 15–60 minutes; some take a few hours. You'll get a notification when it goes live.
You did it. Your first Facebook ad campaign is live.
Now do the hardest thing in performance marketing: walk away.
Step 7: Read Your First Results (24 Hours Later)
Resist the urge to check your dashboard every ten minutes. Facebook needs at least 24 hours — usually 48 to 72 — to exit the learning phase and stabilize delivery. Touching anything during this window resets the algorithm and wastes spend.
When you do check, focus on four numbers and ignore the rest:
- CPM (cost per 1,000 impressions) — tells you how expensive your audience is to reach. Compare against your industry average.
- CTR (Link Click-Through Rate) — anything above 1% on a cold audience is decent; above 2% is good.
- CPC (cost per link click) — the cost of bringing one human to your landing page.
- CPA / Cost per Result — the only metric that actually matters. How much did one purchase or lead cost you?
If your CTR is low, the creative is the problem (image, copy, hook). If your CTR is high but CPA is bad, the landing page or offer is the problem. Fix one variable at a time.
Soft CTA: Want to compare your CPC against what's working in your niche right now? You can spy on competitor ads — including how long they've been running, which a long run usually means they're profitable — inside Adligator. Start free.
The One Step Most Beginners Skip: Research What Already Works
Here's the secret nobody tells beginners: the fastest way to launch a profitable first campaign is not to invent your ad from scratch. It's to study the ads competitors are already paying to keep alive.
When a brand has been running the same ad for 30, 60, or 120 days, it's not because they forgot to turn it off. It's because the ad is profitable. Profitable ads are signal. They tell you, with real money on the line, what hook, image, format, and offer is working in your niche right now.
The traditional way to do this research is the Meta Ad Library. It's free and we recommend you open it once. But after ten minutes, you'll hit the wall every beginner hits:
- You can search a brand name, but you can't filter by audience interest, format, call-to-action, or time on air.
- You see today's snapshot, not how long an ad has been running — the most important signal of profitability.
- You can't bookmark, group, or compare ads side-by-side.
- You can't easily download creatives to analyze in slow motion.
This is exactly the gap Adligator fills. Adligator is a Facebook and Instagram ad intelligence tool built for media buyers, but it's even more valuable for beginners — because it removes the guesswork from your first creative.
Here's the workflow, and it takes about 15 minutes before you ever launch:
- Open Adligator and search your category, niche keyword, or three competitor brands you admire.
- Filter by "Active for 30+ days" — this is your shortcut to the ads that almost certainly print money.
- Sort by format to see what's working right now: image, video, carousel.
- Open three winners and study the first three seconds of the video, the headline pattern, the call to action, and the landing page they send people to.
- Don't copy. Steal the structure. Apply your own product, voice, and offer to the same proven skeleton.
This single 15-minute research step compresses what would otherwise be three months of testing into one afternoon. You're not starting from a blank page — you're starting from a proven pattern.
Before launching, see what competitors run. Try Adligator free and research winning ads in your niche before spending your first dollar.
Common First-Campaign Mistakes and How to Avoid Them
Even with this guide in hand, beginners trip on the same ten things. Here's the list, ordered by how often we see it.
 Common First-Campaign Mistakes and How to Avoid Them
1. Targeting too narrow. Stacking five interests and a 25-mile radius. Meta's algorithm in 2026 is far smarter when you give it room to find buyers. Start broad.
2. Optimizing for the wrong event. "Traffic" or "Engagement" campaigns optimize for cheap clicks, not buyers. Always pick the conversion that pays your bills.
3. Killing campaigns too early. If you turn an ad off after 12 hours because "it's not working," you killed it during the learning phase. Give it 72 hours minimum.
4. Editing inside the learning phase. Every edit (budget, audience, creative) restarts learning. Make changes in batches, not one at a time.
5. Sending traffic to a slow page. A landing page that loads in 5 seconds on mobile loses about 40% of clicks before the customer ever sees the offer.
6. No pixel — or a pixel that doesn't fire. Your data is everything. Test events on day one and again every time you change your site.
7. Trying to test five creatives on $10/day. Math. With a $10 daily budget split across five ads, each ad gets $2 — not enough impressions for any signal. Test one or two at a time.
8. Writing copy for yourself instead of your customer. "We are excited to announce…" is not an ad. "Stop the pulling on walks — one harness, one wear" is.
9. Ignoring the creative. In 2026, creative is roughly 80% of performance. Targeting matters far less than it did five years ago. Spend most of your time on hooks, images, and video.
10. Not researching competitor ads. We covered this in section 9 because it deserves its own chapter. If you remember nothing else from this article, remember: never run a cold ad without first checking what's already winning in your niche.
A Simple Plan for Your First $100
Most beginners ask the same question: "How much should I spend before I know if this works?" Here's a practical framework.
- Days 1–3 ($30): one campaign, one ad set, one creative. Learn the platform. Don't touch anything.
- Days 4–7 ($40): if CTR > 1% and CPA looks promising, duplicate the ad set with a second creative. If CTR < 1%, replace the creative.
- Days 8–14 ($30 + scale): keep the winners, kill the losers, increase budget on the winning ad set by no more than 20% per day to avoid resetting learning.
By day 14, you'll have real data, real winners, real losers, and a much better instinct for your customer than any course could give you.
Frequently Asked Questions
How much should a complete beginner spend on their first Facebook ad campaign? Start with $10–$15 per day for at least 7 days, totaling about $70–$100. Anything less and the algorithm doesn't get enough data to optimize. Anything more and you risk losing money before you understand the platform.
Do I need a website to run Facebook ads? For most goals, yes. You can run Lead Ads with a built-in form (no website required), but a real landing page nearly always converts better and gives you a Pixel-tracked audience to retarget.
How long does it take to get my first sale? If your offer is good and your targeting reasonable, expect first conversions within 24–72 hours. If you've gone a full week with zero results, the issue is almost always creative or offer — not targeting.
Why is my ad "Not Delivering"? Most common reasons: budget too low for the audience, audience too narrow, ad still in review, payment method failed, or learning phase still finishing. Check Delivery Insights inside Ads Manager.
Should I use Advantage+ Shopping Campaigns as a beginner? Not for your very first campaign. Advantage+ works best when your pixel already has 50+ conversions of history. Run a manual conversion campaign first, then graduate to Advantage+ once you have data.
Can I run Facebook ads without Instagram? Yes — uncheck Instagram placements at the ad set level. But you'll lose roughly half of Meta's reach. We recommend leaving Instagram on unless you have a specific reason not to.
Is the Meta Ad Library enough for competitor research? It's a free starting point, but it's intentionally limited — no time-on-air filter, no sorting, no audience filters. Tools like Adligator give you the filters and signals beginners actually need to find winning ads quickly.
Your Next 30 Minutes
You now have everything a beginner needs to launch a real Facebook ad campaign:
- The pre-flight checklist.
- The exact 7 steps inside Ads Manager.
- The four metrics that actually matter.
- The one research move 90% of beginners skip.
- The ten mistakes to avoid.
The only thing left is execution. Open a new tab, head to Ads Manager, and run the steps in order. In 30 minutes you'll have a live campaign. In 72 hours you'll have your first real data. In two weeks you'll know more about your customer than you did from six months of organic posting.
And before you click Publish — take 15 minutes and study the ads your competitors are already paying to keep alive. It's the closest thing to cheating in performance marketing, and it's exactly what every experienced media buyer does on day one.
Start your free Adligator account and see what's working in your niche before spending your first dollar. Your first campaign deserves a head start.